
5 Simple Types Of Photography Lighting For Stunning iPhone Photos
When I first started my photography journey I didn’t pay much mind to the whole notion of light. I just saw something I liked or wanted to remember and I clicked the shutter. Little did I know of how greatly the different types of photography lighting influences your whole photo. Now in hindsight I shouldn’t have been surprised at my lackluster results.
One of my first cameras was a little waterproof Olympus point and shoot. It was so long ago that I had to buy physical rolls of film, remember those! Lol. I would press the button and pray that within the 24 or 36 chances I was given that I had captured at least some keepers. Since I had to be deliberate with so few possibilities I started becoming more vested in the results and my passion for taking better images began.
My journey led me to purchasing my first DSLR 15 years ago. And although it was digital it had a memory card the size of a coffee coaster! Regardless, I was thrilled that I wasn’t limited in the number of pictures I could snap and it allowed me to experiment with a lot of different shots.
I then began to read more on photography and the theme of lighting photography techniques. Unfortunately, I was under the impression that the lighting rules were mostly for DSLRs and I didn’t immediately transfer those concepts to my iPhone photography.
My lighting epiphany
Then one day it dawned on me that it didn’t matter what camera I used, the nuances of lighting in photography was the same no matter what lens was used to capture it.
Lighting is essential in all photography. It affects your results entirely. It is just as true for digital photography on your iPhone as it is for professional photographers with their fancy cameras.
Light can convey a lot of emotion, creates different moods and brings meaning to your subject. Photos can be soft or edgy, creative or traditional.
There are several different types of photography lighting but the most common are hard, soft, front and backlighting. Besides the types of light, other important factors are positioning and the colors of your images.
Understanding the effects of light is the quickest way to improve the quality of the iPhotos you take.
Photography is the capturing of light, your subjects just happen to be in it.
What are some of the types of photography lighting?
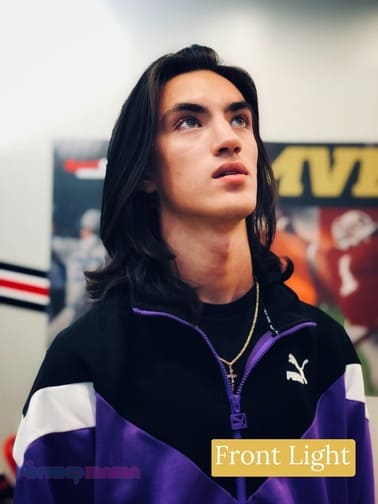
Front light
Front lighting is the most traditionally used type of lighting. It occurs when the light source is coming from behind the photographer, which is you, and directed towards your subjects.
It is one of the most common types of photography lighting because it’s simple to set up and evenly illuminates the subject using natural light or artificial light.
It also allows for the most amount of details to show up as all the shadows fall behind your subject.
Because of this, front lighting generally works great in most situations but can sometimes look the least creative or interesting compared to other types of photography lighting.
Soft light
Soft lighting Is an ideal setting to take photos, especially for beginners. It is a lot more forgiving. It occurs when light is diffused by something and comes from a large light source with wide surface area. There isn’t much transition between shadows so it’s a less intense contrast between dark and light parts of your photo.
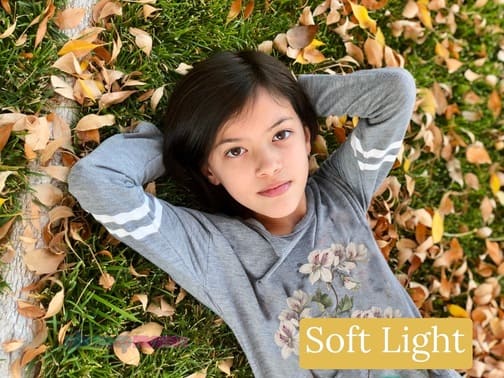
Soft light can be captured anywhere. In an indoor setting it can be created by using a curtain to diffuse the rays coming into a room on a sunny day. If you want even softer light, pick a north facing window and the light will be even more diffused. The larger the subject the more ways the light can come in and ‘attack’ the subject from all angles.
Outdoors it occurs best on cloudy or overcast days. The rays of the sun are diffused by the clouds which create a more spread out source of light. But you can experiment with anything that will diminish the harsh light of direct sunlight with an umbrella or the shadow of a building or tree.You can even try the umbrella idea indoors by diffusing the direct light of a flash or big overhead light.
In general portraits turn out better with soft light. It creates less harsh shadows on faces, softer lines and hides blemishes the best by causing less drama overall.
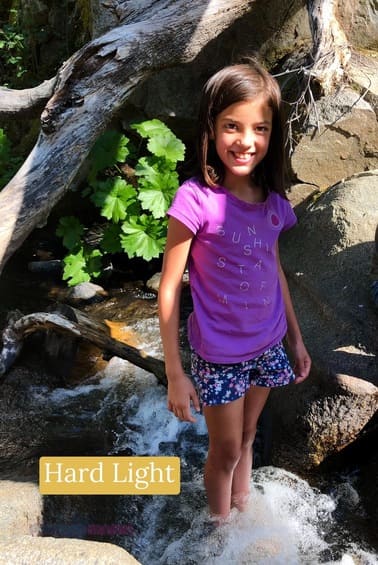
Hard light
Hard lighting is produced from a small light source when the light is directed straight onto the subject. A good example would be when you’re outside in the middle of a sunny day. Although this type of light source can cause some sparkle in the photo it mostly shows intense contrast between light and dark. This in turn produces sharp shadows with minimal transition.
When you’re indoors this hard light comes from an overhead light above your subject or a strong light directed towards your subject, like a flash. This type of light is not usually preferred in portrait photography because it can cause more shadows under eyes and skin blemishes appear more prominent. It is not the most forgiving light unless you add additional light sources to counter the shadows.
But don’t stress out too much about it for now because I’ve managed to take some decent iPhone photos using my flash. It’s just not the most natural or optimal looking. Just be aware of the shadows. Later on when you get the hang of lighting better there will definitely be opportunities to use it and show impactful photos and reveal textures more noticeably.
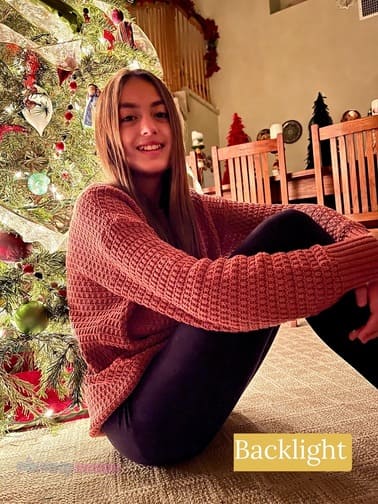
Backlight
Backlighting is exactly as it sounds. It comes from a light source that is behind your subject. It’s a different way to show your creativity in your photographs. You do give up some details in the subject.
For example if you´re taking pictures of your kiddos and they´re in front of a big light you won’t be able to see their faces very well. But you will get some cool looking silhouette images! Long shadows can be a product of these types of photos too.
If you´re concerned with showing more detail in your subject’s face, consider using a diffused light that shines on your subject. This reflects some of the light from the background to the front of your subject. Sometimes portrait shots can get a nice halo effect this way. It’s fun to experiment with backlight, especially outdoors with leaves and flowers.
What affects your lighting?
So how can you make good use of your knowledge of these different types of photography lighting sources and improve your photos overall quality? Begin by moving. That’s right, move while you’re taking photos. It’s the key principle in ‘positioning’.
Observe how changing where you stand with your phone changes the shadows and color of your photos. Experiment with putting yourself in different angles from that light source. Click the shutter on the side of your subjects, raise your phone above and press the shutter and then move it down and angle it upwards and snap away.
You can also try spinning your phone 180 degrees and observe how the positioning of the lens works out. This can create interesting shadows which perhaps are more flattering.
Also, be aware of the size of your light source. Are you outside on a cloudy day or a bright day? This will affect the softness or crispness of your images. Or are you indoors with a room lamp that’s directly lighting your subject?
Pay attention how close your subject is to your light source. The distance will have an impact on the shadows and the amount of texture and levels of contrast in your photos. You can play with moving the lamps and lighting around and see the outcome.
What affects the colors in your photos?
A lot has to do with human visual perception. Observe the light that’s present when you’re taking an iPhone photo. Different types of photography lighting sources create different colors. Are you shooting outdoors in broad daylight or are you indoors with fluorescent or incandescent bulbs?
Ideally you capture the color you want right away. If not, the beauty with technology these days is that you don’t even have to use an outside source besides what’s on your phone already!
Your iPhone camera app comes with preset filters that you can choose from. There’s Vivid, Warm, Cool, Dramatic, to name a few. If for any reason your phone didn’t adjust the white balance well enough you can always try the ‘Warm’ filter.
There are also other more robust editing apps with more filters available in the app store. Or you can use some other editing features on your iPhone to manipulate the outcome but that’s a discussion for another time.
What’s the best type of photography lighting?

Golden Hour
Bet you thought I forgot number five. Nope, I just left the best for last!
My discussion on the different types of photography lighting would not be complete without talking about the most flattering time to snap some pix.
You might have heard of it – it’s referred to as both the Golden Hour or the Magic Hour. And it gets these names for good reason! During this phenomenal time of day most of the photos you take have a soft and warm look to them.
The golden hour is the period of time shortly after sunrise and before sunset. ‘Hour’ is a figurative term here as the length of this type of photography lighting varies depending on your location and the time of year.
In simple terms, it’s when the direct beam of the sun is less intense as it sits lower on the horizon. This produces softer, redder light that reduces dark shadows and overexposure. It’s even more magnified when you take it near water and capture the reflective light that bounces off of it.
During the golden hour your photos not only get a beautiful sky background but your subjects are illuminated in the most magical way. It’s truly the best time to capture some stunning shots!
In Conclusion
Now that you have a better grasp of some of the different types of photography lighting, get out there with your iPhone! Take pictures of your kids, your dog, indoors, outdoors, even the scenery that’s around you.
Go outside today in whatever light exists and begin to take some shots of anything that strikes your fancy. Then move yourself around that subject. Try experimenting with that same subject again at a different time of day. Compare your results.
Doing this every so often will begin to build up your awareness of how lighting affects your photos. Gradually you’ll improve your eye for light and you’ll begin to take some really great iPhone photography!
Bonus Video
Check out my YouTube Short for a quick recap of the five types of photography lighting you just learned about. Then peruse the channel for more fun iPhone photography tips videos!
PS – I think you’ll find my free guide helpful – 6 Successful Ways To Organize Your iPhone Photos With Albums. In it you’ll learn simple but powerful steps to organize all the photos you’ll take with your new found lighting knowledge!


0 Comments