
Savor Marvelous iPhone Portraits Now With These 5 Powerful Techniques
Long, long ago in a place far, far away….Lol
No, seriously, before I discovered that I had an eye for photography I thought that great portraits of real people could only be taken at studios by professional photographers.
The few times we took family photos we went to Sears, remember that place? I would also see similar photos when I visited friends’ homes. Their parents would have portraits of their families hung on the wall with everyone sitting stiffly and smiling at the camera. That’s how I viewed portrait photography.
Fortunately that just isn’t the case anymore.
This truth is that today the simple fact that you possess a quality camera in your pocket changes everything. You have a great tool at your disposal with your iPhone that can be used at a moment’s notice. Taking iphone portraits of your family can be spontaneous or you can take advantage of being at a park or on a trip and take an extra few minutes to take some choice photos of the kids or your friends.
There are 5 main techniques that can transform a good photo of someone into great iphone portrait photography of that same person. You can start by using Portrait mode on iPhone (that by itself can snap some pretty professional looking shots) but also keep in mind where you’re taking your photos, the angles you use, your subject’s posture and how natural it looks.
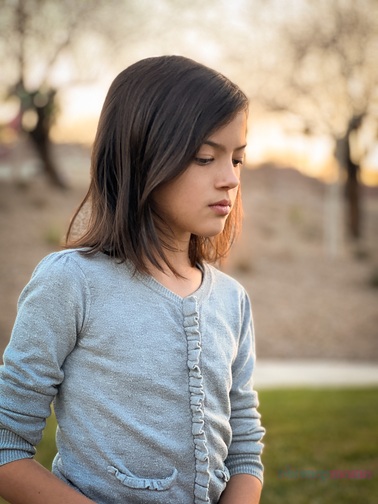
1) Portrait Mode

It seemed that overnight the layman’s ability to take a professional looking photo was changed in 2016 when Apple introduced their iPhone 7 Plus, the first iPhone with portrait mode.
Portrait mode is located next to the regular ‘Photo’ mode on your iPhone and it creates a depth of field effect that previously had only been available on DSLRs and fancier expensive cameras. With it on your iPhone takes two photos, one with the depth effect and one without. In essence it keeps your subject in sharp focus while blurring the background behind them. This maintains your attention on the subject and diminishes the distraction of louder backgrounds.
To optimize Portrait mode on iPhone you need to position your iPhone camera between 2 to 8 feet from your subject (your phone will also remind you when you need to keep these distances). This means you can even take a selfie in Portrait mode if you have an X or newer!
Once you take your iPhone portraits you can control the amount of blur by going to your camera app and clicking on ‘Edit’. From there you will see ‘Portrait’ in a yellow or orange box at the top. Click on that box to remove the blur if you so choose.
You can also control the amount of blur while also in ‘Edit’ and going to the top left and tapping on the horizontal oval that starts with an ‘f’ and then a number. A slider will appear and you can either move it left or right to intensify the blur or diminish it.
Along these lines you can play with the choice of lighting that appears at the bottom of the ‘Edit’ page. Choose Natural Light, Studio Light or Contour Light which are options that either even out the light or add shadows. The other 3 features are Stage Light, Stage Light Mono or High Key Light Mono. All of these latter options crop out your subject and change the background to black or white. I usually stick to the first three choices. They seem to have the best results in my portrait photos. Usually I test each one to see which displays my subject in the most flattering way.
2. Clean Background and Blank Space

The best way to take iPhone portraits of a person or your pet is by having minimal distractions behind them.
A busy background takes away from your focal point which is your subject. Any bright colored objects in the frame will move your viewer’s eye to that object.
In order to have a more impactful iphone portrait photography be sure to shoot your image with a neutral background or more solid colors in the scene.
An alternative you might want to take is to position your subject on one side of the frame and leave the rest of the frame with a plainer setting
This ‘blank’ area is known as Dead Space by photographers. It’s any space that doesn’t have other elements to distract the viewer’s eye. It can be muted, empty, faraway or one-toned colors. It gives the photo a heavier dimension feeling and your subject pops out even more.
3. Mix Angles and Create Perspective

Angles, angles, angles….this is where good photos can turn into great iPhone portraits!
You can capture your subject from unique angles and this will change the perspectives of the viewer. The subject stays in place but the photographer moves. This can make the photo more interesting.
There’s eye level perspective which is the one typically used by many people.
Another option is to hold your iPhone above your subject. This is called High Angle Perspective. What’s at the forefront looks larger and the rest shrinks and blurs out.
Or take a shot while positioning your iPhone coming from below your subject, called Low Angle Perspective. This gives your subject a bigger, more powerful look.
Also attempt some shots from the side. Have your subject keep their gaze forward and you can get some interesting profile photos.
Experiment with all sorts of different angles. Don’t be shy, you have nothing to lose and you can surprise yourself by the results!
4. Body Positioning

The way your subject is positioned can make a big difference in the outcome of your iPhone portraits.
Your subjects can be sitting, standing or anything in between. The most interesting shots are the ones where your subject is not standing stick straight facing forward.
If your subject is standing you can have them lean against a wall. Or if they’re standing solo then try getting them to tilt a shoulder down in your direction. Many times you get the best results by your subject having one shoulder higher than the other (usually the one in the back).
If the subject is sitting, try different poses while in a chair; lift a leg over the armrest, sit on the arm rest and put their feet on the chair, or sit on the ground with their knees raised.
Also in regards to their faces, tilted ones get the most expression. Keep an eye for inverted or hiding chins. Those don’t look very attractive and can cause the unwanted ‘double’ chin. Have your subjects lift their chin a bit or if the chin is angled down do so ever so slightly.
The hair is another thing to watch out for. If it’s long, push it to one side so the face is revealed. Or for a more mysterious feel, have the hair shade one of their eyes (or both).
How you crop your iPhone portraits while you’re taking them can make a difference too. Remember in full body length photos not to cut feet or hands out of the shot. It makes the subject in your image look very odd. For the best results you can take photos above their waist or crop the shot at their knees.
Also, smiles don’t have to be part of the scene. I’m used to it having broody teenagers that don’t always like to smile. This can come in handy when you want to add a little mystery or a subdued feeling to the image. Your viewer can be more drawn into this type of photograph.
5. Be Natural

These natural types of iPhone portraits can be considered more candid and also seem the least staged.
If you are photographing more than one person you can have them chatting amongst themselves. This brings out calm, relaxed and natural faces. Sometimes it even catches some genuine smiles and giggles, especially if you’re photographing kids.
Another great technique if you’re outside at a park or at the beach is to have your subjects walk towards you while you’re photographing them with your iPhone. This will make your subjects look less posed and more in their element, and it creates a better quality image.
Lastly, you can take an iPhone self portrait when you feel like focusing on yourself in your natural surroundings (and then add your favorite Portrait mode effects if you like).
In Conclusion
The only way to get better with taking iPhone portrait photography is by practicing and taking a lot of shots!
Try one or all of these techniques the next time you’re out and about taking photos of your family or friends.
Pick a place that has neutral colors and experiment with how your kids are standing or sitting. Then move the iPhone around for the shot.
Tell them silly jokes to get them to laugh and always, always capture the shots with portrait mode on iPhone. The blurred background gives iPhone portraits that extra touch of professionalism.
By utilizing these time-tested techniques you’ll see how quickly you can learn to master iPhone portrait photography!
Bonus Portrait Mode Tips Video
Just in case you’re more of a visual learner I created this iPhone Portraits video to help you get all the portrait techniques down from my post. Enjoy!
PS – With so many new family portraits on your iPhone you might find my free guide helpful – 6 Successful Ways To Organize Your iPhone Photos With Albums. In it you’ll learn simple but powerful steps to get your photo gallery under control!


0 Comments